

As 3D printing becomes more accessible, the number of custom blasters developed by NERF hobbyists has exploded. Today, we're diving into an impressive design hailing from Taiwan: the "G5"!
The Battle Planet G5 is a spring-powered blaster designed by Ezekiel Lin (EZ) of JSPB. It's built around three core principles: ease of use, durability, and high accuracy, thanks to an integrated rifled barrel. In addition to JSPB, EZ has also licensed Icebreaking Game Studio to produce and sell the blaster. The version we're reviewing today is printed by Icebreaking.
▼Unboxing:

Product Name: JSPB Battle Planet G5
Manufacturer: Icebreaking Game Studio / JSPB
Current Price: 2400 NTD
The kit includes all the necessary 3D-printed parts, decorative stickers, an assembly manual, and a parts list. The core components are the printed pieces, along with two PVC pipes, three O-rings, and hardware like springs and screws. The retail version also comes with five half-length darts.
▼The included parts list lets you verify that everything is present. It notes two front barrel options, Type A and Type B, one of which is chosen at the time of purchase. I received Type B.

▼Assembly:

Here's a look at all the parts laid out. (I actually missed the smallest screw in this photo.)
▼First, insert the barrel spring and secure the end cap with the smallest screw. Remove the four long screws from the main body.

▼Insert the priming handle into the priming rod and secure it with screws on both sides.

▼Apply lubricant to the inside of the large PVC pipe (the plunger tube) and on the piston's O-ring for a smooth seal.

▼Insert the plunger tube into the blaster shell, then slide the piston into the plunger tube.

▼Secure the rear cap of the plunger tube with the four longest screws.

▼Assemble the catch mechanism behind the trigger. Apply a bit of lubricant, place the components, and secure them with a pin.


▼Assembling the trigger guard and grip. Although the manual says to install the grip first, you won't be able to fit the trigger guard if you follow that order.

▼Insert the trigger return spring, then install the trigger guard and grip simultaneously.

▼Use the second-longest screw to secure the grip.

▼Then use the smallest screw to secure the trigger guard.

▼Assemble the adjustable part at the bottom of the grip. Place the component and secure it with the two third-longest screws, making sure to put the circular washers on first.

▼To assemble the front barrel, slide the pivot section into the track on the underside of the muzzle. This requires a bit of force.

▼Lubricate the outside of the PVC pipe. If you don't, it will be very difficult to remove later.

▼Assemble the front barrel's buffer component.

▼This also requires some force to push in; lubrication is recommended.

▼Following the manual, place it into the track under the muzzle and secure it with the smallest screw.

▼Assembly complete!

▼Other accessories. On the right are the "G5" logo stickers that come with the retail version. The optic, foregrip, and JSPB logo sticker on the left were provided by the owner of Icebreaking Game Studio.

▼The optic and foregrip attach to the blaster's Picatinny rail with pins.

▼Fully decked out!


▼This is the speedloader provided by the designer, EZ, which is sold separately for 212 NTD. We'll cover how to use it later.

▼Aesthetics:


The overall print quality is excellent, with a smooth finish.


▼The grip is ergonomic and feels comfortable to hold.


▼Unit-01, launching!

▼Specs and Features:

The blaster measures approximately 35.3cm long, 5.2cm wide, and 16.2cm high, with a priming draw of 6.6cm.
▼You can customize the color of most 3D-printed parts, except for the central shell, priming rod, and piston. The Icebreaking version comes with a black shell, while the JSPB version has an orange one.

▼The blaster weighs about 0.49kg (including the optic and foregrip).

▼Here's a comparison with the functionally similar Dart Zone Pro MK-2. Both are top-prime, internal magazine-fed, half-dart springer pistols. The MK-2 measures 23.6 x 4.5 x 15.4cm, weighs 0.27kg, and has a 4.6cm prime.

▼The top of the shell features a 21mm Picatinny rail for mounting standard airsoft optics and other accessories.

▼There is also a 21mm Picatinny rail under the muzzle.

▼Example loadout:

▼The top rail has a groove down the middle that can be used with the front sight for aiming.

▼By loosening the two screws at the bottom of the grip, you can adjust its position up or down to change the grip length. The image above shows the highest position.

▼And the lowest position. This is the first time I've seen an adjustable-length grip, a very thoughtful design feature.

▼The G5 is designed for half-length darts and has a 5-dart capacity. However, because it uses an integrated barrel and internal magazine design, it can also fire full-length darts without any issues! If you use only full-length darts, the maximum capacity is 2.

You can also mix and match, and combinations like short-long, long-short-short-short, or short-long-short-short-short will all fire correctly.
▼How to Fire:

The G5 is a single-shot springer. To load, you must first remove the front barrel.
▼Insert darts from the front of the barrel. It holds up to 5 half-length darts. Because the barrel has integrated rifling, the front end is slightly tighter; you'll need to apply a bit of pressure to ensure the darts are fully seated. (If they aren't pushed in far enough, you might get a weak shot or fire two darts at once.)

▼After loading the darts, reattach the front barrel.

▼Pull the priming handle all the way back to catch the plunger, then pull the trigger to fire.

The priming force required is lighter than a stock 15-round RIVAL springer, easily manageable for a 6th grader. The trigger pull is also very light, making for a comfortable shooting experience, though there is noticeable vibration upon firing.
▼The top-prime handle is much easier to use than the side-grip style of the MK-2.

▼How to use the speedloader:

▼Load five half-length darts.

▼Align it with the barrel and insert the speedloader.

▼Push the red part down to ram the darts into the barrel.

▼The speedloader doesn't push the darts quite far enough, so you'll still need to give them a final push by hand. I haven't experienced any jams in-game, and for a blaster with only a 5-dart capacity, it's extremely useful.

▼Firing Test:

For this test, I used three types of half-length darts. From left to right: Worker Gen3, Adventure Force Pro, and Dart Zone MAX.
▼Velocity Test:

The chronograph used is an XCORTECH X3500. I tested each of the three dart types for three rounds, with 5 shots per round for a total of 15 shots each, recording individual velocities and calculating the average.
▼Test Results:
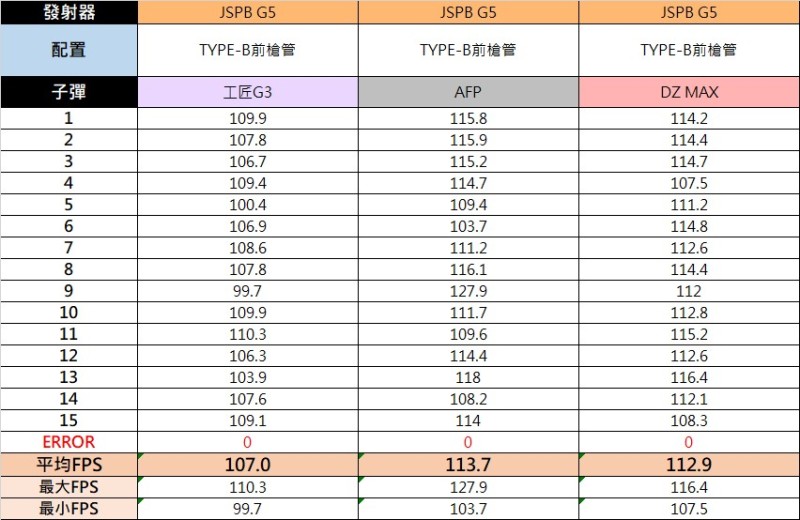
The data for all three dart types was very similar, with an average FPS around 110. The deviation between shots was minimal, showing very consistent performance. For comparison, the MK-2 hits an average of 117.9 FPS with Worker Gen3 darts and 130.5 FPS with AFP darts.
▼Accuracy Test:

I fired at this RIVAL target from a distance of about 8 meters (approx. 26 feet), using only the blaster's built-in iron sights. The target is about 19.5cm wide and 18.5cm high. I first fired a 5-shot group to get a feel for the trajectory, then fired five more groups and took the best four as the final result.
▼Test Results:
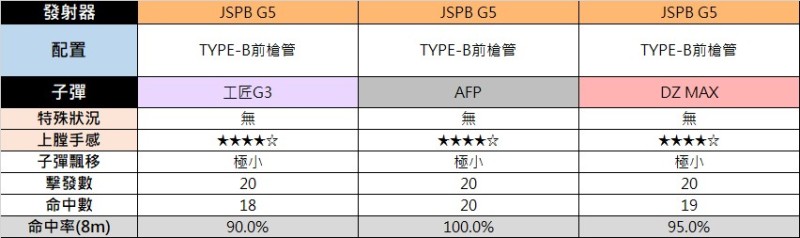
In a word: accurate. The power of the integrated rifled barrel is surprisingly impressive.
▼Performance Summary:
Velocity is consistent, though slightly lower than the MK-2, making it perfect for casual games. For competitive, hobby-grade games, the FPS is a bit low, with noticeable dart drop at 8 meters. However, its accuracy is the best I've ever seen in a stock blaster, completely blowing the MK-2 out of the water even without an added optic. Overall, its performance as a pistol-class blaster is excellent.
▼Field Test:

I recently took it to an event up north that had both casual and competitive games.

The event was held on a grassy field under an overpass. The play area was large, I'd estimate over 60x30 meters, with the shortest distance between cover being about 10 meters.
In-game impression: Again, one word: accurate!
Even outdoors with some wind, the G5's accuracy was incredibly consistent. In one game, I scored two consecutive hits on two different opponents—so satisfying! However, its shortcomings in a real game are also quite apparent. The lower velocity limits its effective range; you really need to get within 10 meters of an opponent to be effective. The 5-dart capacity is too low for a primary, and a single speedloader is definitely not enough.
▼Field Test Summary:
I would classify it as a primary for casual games (requiring multiple speedloaders) or a secondary for casual games. As a secondary, however, it's a bit bulky and inconvenient to carry without a holster.

▼Conclusion
◎Pros:
1. Compatible with both half-length and full-length darts
2. Very light priming and trigger pull
3. Extremely accurate
4. Customizable colors
◎Cons:
1. Low ammo capacity
2. While colors are customizable, the largest part—the main shell—is a fixed color
3. 3D-printed material is susceptible to drops and high temperatures
To be honest, I didn't have high expectations for the G5 at first, but after using it for a while, it has really grown on me. While it doesn't quite unseat the MK-2 in my personal hierarchy, the G5 certainly has significant advantages in terms of price, accuracy, and dart compatibility.
It's fantastic to see such a great blaster come from a Taiwanese designer, and I hope to see more excellent "Made in Taiwan" blasters in the future!
●Final Verdict: 85 out of 100. That Unit-01 color scheme... is just too good!
