
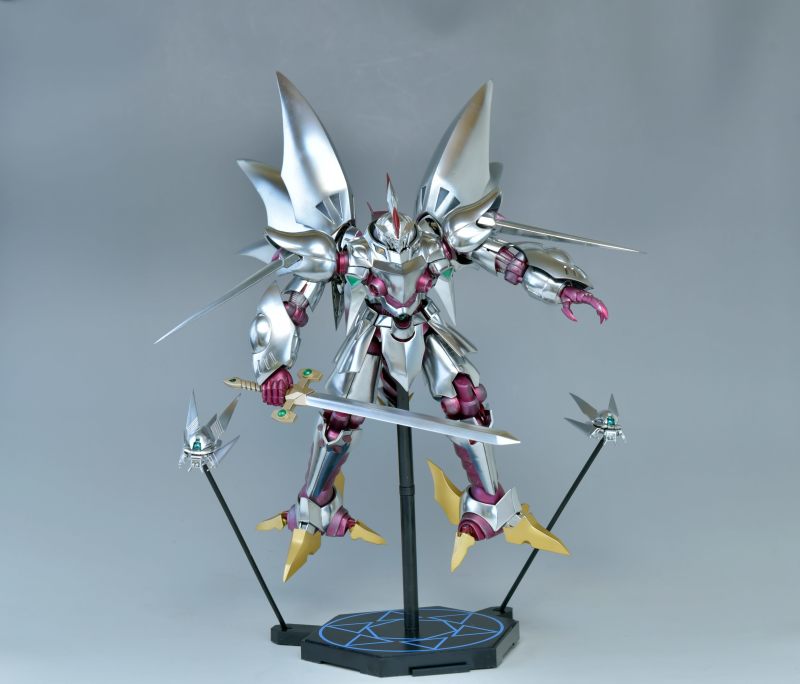

While cleaning out my storage recently, I stumbled upon this classic: Kotobukiya's 1/144 transformable Masou Kishin Cybuster. Given that Kotobukiya kits are notoriously difficult to find once they go out of production, and it's been over a decade since I bought this, it's safe to call this a truly out-of-print gem.
Anyone who collects Kotobukiya model kits knows the score: if you miss the pre-order, you're stuck waiting for a reissue that might never come. I once waited nearly six years for a limited restock of a ZOIDS kit... and it was an extremely small production run.
So here's a pro-tip: if you see a Kotobukiya kit you like up for pre-order at a decent price, just grab it. Otherwise, you might get married and have two kids before you ever see it get re-released, haha.
For this build, I wanted to finally create the painted Cybuster I envisioned back when I was younger. So, I got to work and put it all together.
I'm quite satisfied with the final result. While the articulation isn't great by modern standards, it's got more than enough shelf presence to make up for it!
And the main event: this thing transforms!
A word of caution: never approach a Kotobukiya kit with the same expectations as a Bandai one. Koto kits can be a bit more challenging to assemble. Just the test-fitting process alone can take an eternity.
My experience with Kotobukiya can be summed up as "the three highs and one low":
High on sharp points (you will bleed)
High on shrinkage and seam lines (you'll be filling putty forever)
High on price (it will drain your wallet)
Low on reprint chances (the eternal wait)
Here's the full build log. Seeing the original release date on the box is a real "tear of time" moment.
For those who prefer video, you can watch the full process here:
【KOTOBUKIYA 1/144】4K "You Will See the Tears of Time" - Out-of-Print Masou Kishin Cybuster Build
▼ First, seam line removal on the most obvious parts. To speed things up, I used Modo's MK-21 putty directly. This MK-21 is fantastic... I've officially retired my old red putty. XD

▼ I apply it undiluted, scooping it out with a toothpick to fill the gaps. It dries incredibly fast—less than fifteen minutes—and is very easy to sand. If you're using a power sander, make sure you have good ventilation, because it creates a ton of dust.


▼ The knee sections were a bit tricky. Not only are they curved, but they also have uneven surfaces, making manual sanding difficult.

▼ I broke out the power sander and had it done in under two minutes. Kotobukiya kits are one of the few times I use power tools, aside from building Bandai Perfect Grade kits. For most other series, I stick to files and sanding sponges.

▼ I used the same MK-21 putty to fix the more noticeable shrinkage marks on the parts.

▼ Since this kit lacks a full inner frame, it's easy to sub-assemble parts for painting. Most of the components can be put together before hitting the spray booth.


▼ I used two types of surfacer for this project: black and gray. The black was for the main colors, while the gray was for the secondary colors.
A common question is whether primer is really necessary.
You have to understand the purpose of a primer coat. Besides checking for surface imperfections and filling in fine scratches, it also improves paint adhesion and ensures a uniform color base. That's why I never skip this step, no matter how tedious it seems.

▼ When building a Kotobukiya kit, you absolutely must test-fit everything before painting. You never know when Koto will throw you a curveball. Imagine finishing your paint job, only to realize during final assembly that a part is visible from both sides and has an extended armor piece... The frustration is real.


▼ Someone on the forums once asked what a "saturated" coat of gray primer looks like.
I usually spray until it looks like the image below. This is my standard for a fully primed surface before applying color.
The principle is the same for any paint or primer: apply thin, multiple coats. Sweep across the part, working from the outside in, from the edges to the center. Overlap your passes (layer A over layer B), and if you're worried, use a lower pressure setting on your airbrush.
Beyond technique, the thinning ratio for your primer is crucial. People often suggest 1:3 or 1:2, but those are just guidelines based on their own feel and setup. You have to experiment to find the perfect ratio for your own tools and environment.
With so many paint brands on the market, each with different pigments and formulas, there's no single "correct" ratio. It's something you have to dial in yourself through practice; advice from others is just a starting point.

▼ I didn't change the color for the inner armor sections, sticking with the instruction manual's recommendation of pure black. After the gray primer dried, I sprayed a coat of GAIA EX-02.

▼ For the main color parts, I went straight to applying varnish over the black primer.

▼ Once the GAIA EX-02 was dry, I applied a layer of clear matte topcoat to give the parts a flat black finish. I absolutely love this matte texture.

▼ The claws and other yellow parts were painted with GAIA 122. The sword hilt and the base for the secondary colors were done with GAIA 010.

▼ The painting sequence for the secondary colors was:
Gray Primer -> GAIA EX-02 -> GAIA 010 -> GAIA 034 -> GAIA 047
You can see the final result by fast-forwarding through the video.

▼ After applying varnish over the black primer, I sprayed a mirror-finish chrome paint. This stuff is amazing; you get addicted after using it just once.

▼ The inner shoulder armor was painted with GAIA EX-02.

▼ Time to break out the chrome powder to alter the color of the mirror silver finish.

▼ You can use a cotton ball, microfiber cloth, or makeup pad as an applicator. I prefer using a cotton ball. Remember to use just a tiny amount, or you'll have a disaster on your hands.

▼ Rubbing the powder onto a matte surface with raised mechanical details like this can create a unique metallic texture.

▼ On the mirror-finish paint, I used a circular motion to buff the powder and change the color.

▼ After buffing, the GAIA EX-02 base coat is transformed from a flat finish into a metallic one.

▼ Lower body complete.


▼ A very distinctive tail (just kidding).

▼ Upper body complete.


▼ And we're done.


▼ Cybird Mode! XD

▼ On the action base for the full display!

That's the entire build log. I hope you all enjoyed it. I got a little misty-eyed after finishing this one—a true tear of time. XD
Barring any surprises, my next project will also be from the Super Robot Wars series... XD
Below are some glamour shots. Since this kit doesn't have much articulation, there aren't many photos. This build was all about nostalgia and shelf presence. Articulation? What's that? ...XD
"You Will See the Tears of Time" - Out-of-Print Masou Kishin Cybuster Gallery


Also posted on my Blog
For more model kits and toys, check out my gallery here. My Model Build History is also updated regularly.