
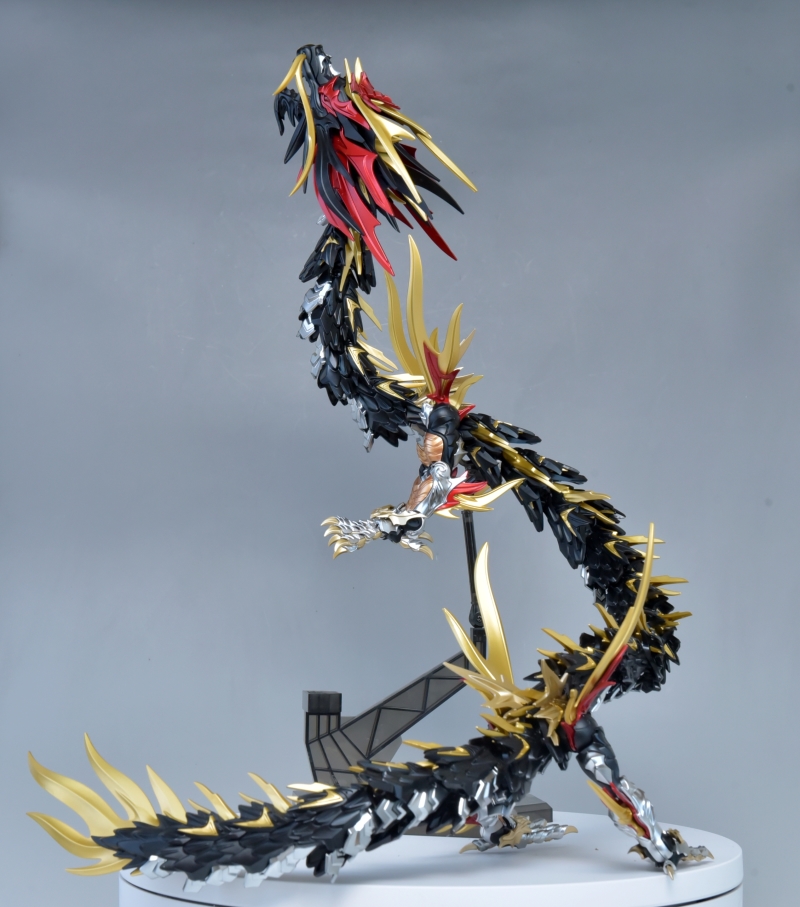

This is a commission build for a friend. The price? One extra-large bottle of Tea King sugar-free green tea.
This is a mainland Chinese model kit from the "Mo Jing Xian Gu" series, as mentioned in the title. The manufacturer has developed a series of assembly models based on Chinese divine and sacred beasts. The four beasts are the Azure Dragon, White Tiger, Vermilion Bird, and Black Tortoise. The first release is the Azure Dragon, and the second is the White Tiger.
Quoting the description from the manual:
The Dragon is one of the Four Celestial Spirits and the auspicious spirit of the East, belonging to the lineage of the five-clawed true dragon.
The Azure Dragon, one of the ancient "Four Celestial Spirits" of China, is the deity of the East representing Taihao and the Seven Mansions of the East. It is an auspicious spirit, associated with the trigrams Zhen and Xun in the Bagua, and is the essence of the Wood element in the Five Elements. It has five claws, a body of azure color, and is of the direct bloodline of the true dragon clan.
My friend wanted a different kind of dragon. Originally, he wanted a Blue-Eyes White Dragon, but... that was too difficult. I suggested a red dragon would be the easiest, but he wanted something different. After much thought, he sent me a picture of a Digimon... and so, the black dragon concept was decided. XD
The main body had to be black, but I had free rein over the other colors. However, I didn't want to work for free, so I accepted this friendship commission for the price of a large bottle of Tea King. The old rule applies: no rushing me, because I'm not a professional and might work very slowly... Despite saying that, I still managed to finish this model in a week. XD
My friend only does straight builds, and he said this would be his first-ever commissioned piece, which he would treasure. Thinking this, I decided to treat it with Gaia Color paints... So, I selected the necessary gold paints from Gaia, combined them with the Digimon picture he gave me and the color scheme in my head, and this black dragon was born after about a week of working 2 hours a day.
Below, I'll first share the building process, and I'll talk about my final thoughts at the end.
▼Video Version 4K
▼There are a ton of parts. I cut them all off the runners first and then processed them in one go. The entire kit features "undergated" nubs, so trimming them was relatively easy.

▼The body is composed of over 20 identical segments. Assembling the same components repeatedly requires some patience...

▼Decided to start painting with the simplest colors first.

▼The parts for the custom color scheme are set aside for now.

▼For this build, I used a combination of Gaia Color and GSI Creos paints for airbrushing.
I used GAIA EX-02 as the main color for the body.
1. First, spray a layer of primer surfacer.
2. After it dries, spray on GAIA EX-02.
3. Finally, mix GAIA EX-04 with GSI 30 and spray a layer of custom-mixed matte clear coat to unify the finish.

▼During assembly, there are many gaps of various sizes. To speed things up, I used Dspiae's black instant glue for filling. I used it with their proprietary solvent (the bottle that looks like nail polish in the picture) to accelerate the curing time of the black instant glue. The unboxing video and tutorial are already in production and will be uploaded next time.

▼For this build, I used the second-generation mirror chrome silver:
1. First, spray on GAIA black surfacer.
2. After it dries, spray on a gloss varnish.
3. Finally, use a large-nozzle airbrush to spray on the second-gen mirror chrome silver. I have to say... the second-gen mirror chrome is indeed easier to work with than the first, and the paint film is harder than the first gen after drying.

▼So shiny! Sprayed it all in one go!!

▼Compared to the first-gen mirror chrome, the second gen is even better!
The parts in the picture have not been sprayed with any clear or gloss coat. This is purely the result after airbrushing with a large nozzle and waiting for it to dry.

▼Custom coloring complete~ I'm starting to get excited about how it will look when assembled!!

▼There has to be red, because I especially love the color red.
1. First, use GAIA silver surfacer as a base coat.
2. After it dries, spray on GAIA 010.
3. After GAIA 010 dries, spray on GAIA 034 Primary Color Red.
4. Finally, spray on a candy red (you can also choose clear red). The reason I used candy red is because the bottle is huge and I want to use it up quickly....
As for GAIA 133, it was used on some parts of the four legs (pictures to follow).

▼In addition to the metallic red, some other parts were also painted with GAIA 010.

▼Let's take a look at the four paws first. GAIA 010 paired with mirror chrome silver.

▼All five digits are fully articulated. Painting these will make you want to puke from skewering parts... One paw has five digits, and you have to make four paws. Each digit has three joints, so that's twelve parts to skewer for just one paw... Basically, you'll be skewering parts until the end of time.

▼The claws can all bend, and each joint moves independently.

▼Finally, the color used in the largest quantity: GAIA 122 gold. Luckily, I still have about fifteen bottles of this, but this build used up almost a whole bottle... Fortunately, one bottle can be thinned to 60ml, so it's still within an acceptable range.
1. First, use GAIA silver surfacer as a base coat.
2. After it dries, spray on GAIA 122.
3. Job done.

▼Silver surfacer base coat.


▼Finally, sprayed with GAIA 122.


▼Head complete. I originally wanted to paint the eyes gold, but after looking at the picture my friend gave me, I decided red would be more suitable.

▼The result of repetitive, repetitive, repetitive work.
1. The black parts are a custom-mixed matte black.
2. The gold parts use GAIA 122.
3. The silver parts are second-gen mirror chrome silver.


▼The whole dragon is really long... so long that you can use the stand to recreate the "Rising Dragon Gyoza" meme.

▼It's even longer after attaching the body segments that connect to the four legs.

▼Paws complete.

▼I really have a love-hate relationship with these claws~

▼Complete~

▼A word of caution here:
The paws connect to the body using very small pegs on the body segments. It's recommended to reinforce those pegs with a bit of AB putty. Otherwise, given the weight of the body and the stress on the four legs, there's a chance the pegs could break during play because they are really~~ tiny.

▼It's truly massive. It couldn't even fit on my workbench, so I had to coil up its whole body for the photo shoot XD.


That's all for the build process this time, I hope you all enjoyed it. Complaints aside, friendship is still priceless. It's really hard to put a price on things between good friends, especially since I'm not a professional and just do this for fun. I'm also grateful for my friend's trust in letting me have fun with this kit. I hope he'll be very satisfied when this dragon is in his hands. What's that, the White Tiger??? You'd better bring a whole case of drinks for that one!!!
Now, let's talk about the building experience:
The whole dragon is very imposing and allows for all sorts of play styles and scene combinations. The pegs connecting the body to the four legs are a bit precarious, but I don't think it's a major issue. I reinforced them during the build, so I believe it won't break so easily and can be posed with peace of mind.
I also used AB putty to reinforce some of the more fragile parts, especially the pegs connecting each body segment. Additionally, parts that were too tight were modified. After all, it's a mainland Chinese kit.
For someone like me who is used to assembling Bandai and Kotobukiya kits, it was honestly a bit of a struggle. First:
1. You'll need fingers of steel, and I mean using about 90% of your strength.
2. Some seam lines are unacceptably large and require a fair bit of filling.
3. The tolerances between some parts are too loose, requiring modifications like trimming pegs and sanding them down.
Putting those three points aside, the fact that this kit managed to have "undergated" nubs on the entire model is a small consolation during assembly XD.
Below are the glamour shots, I hope you all like them.
▼A Bottle of Tea King, Friendship is Priceless! Mo Jing Xian Gu Series - Black Dragon.


Also published on my Blog
For more model kits and toys, you can check them out here
Model History Outline also updated