
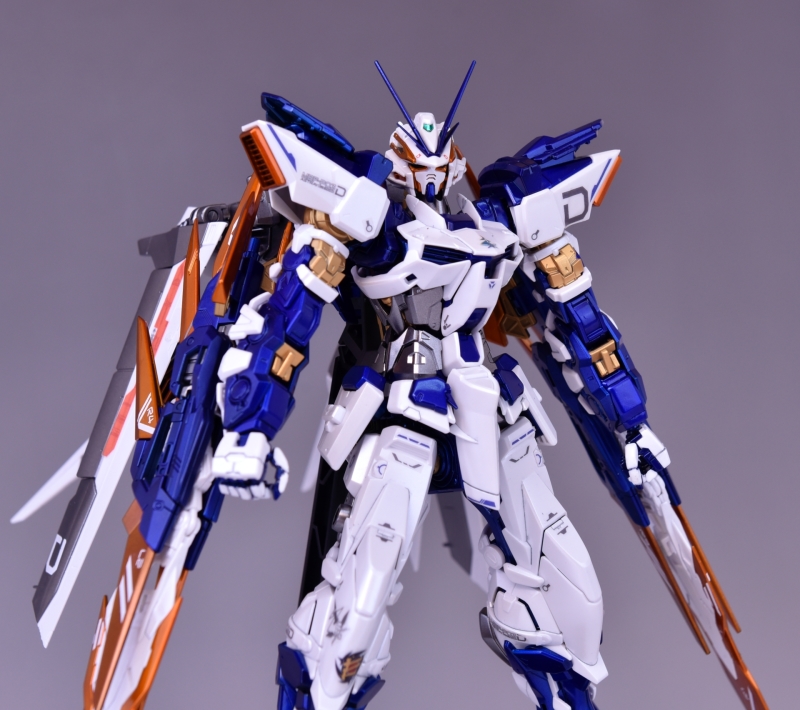


I was originally planning to wait for the Gallantmon kit to start my next project, but with a growing backlog, I felt the need to clear some space. I randomly picked out this kit, the MG Astray Blue Frame D, since you don't see it shared online as often.
For this build, I decided to go with a full metallic finish. I did some color-swapping on the weapons and used different techniques to apply metallic blue to the inner frame and outer armor panels. Here's the complete build log—hope you enjoy it!
For those who prefer video, you can check out the video walkthroughs. If you'd rather read, just scroll down for the full text and photo breakdown.
Part 1: Inner Frame Construction - MG 1/100 Gundam Astray Blue Frame D
▼Video Walkthrough
▼Here's the kit we're working on, the MG Astray Blue Frame D.

▼The kit features a ton of undergated parts, which makes the cleanup process incredibly smooth and easy.

▼After sanding, a thorough wash is essential before painting. I just toss the parts into a beaker for a session in the ultrasonic cleaner.


▼The left dial adjusts temperature (not needed for this), and the right one sets the timer.

▼Once the parts are clean, it's time to get them on skewers for painting. I've been asked how much these cost. They're actually very cheap to make yourself—just buy some alligator clips from an electronics store and some bamboo skewers, and you're all set.

▼I primarily used Gaia Color paints for this project.

▼Before any color application, I start with a coat of Gaia Gray Surfacer.

▼After the primer dries, I apply a coat of Gaia EX-02 Black. This black base is crucial! The glossier it is, the better. I recommend adding a layer of Gaia EX-03 Clear Gloss on top of the black for the best results.

▼For the silver parts, I chose Gaia EX-07 Silver as the base for the metallic blue. This silver layer is very important, as its luster and fine particles will directly affect the final shine of your metallic topcoat.


▼Gaia 125 Star Bright Duralumin was used for a few select parts.

▼Gaia 132 Pearl Copper was used this time for some of the exposed armor sections and inner frame details.

▼The image below shows the effect achieved by spraying Gaia 123 Star Bright Iron over the black base coat.

▼After all the base coats were done, I used Gaia 005 Pure Blue for the main color.


▼Matte Metallic Blue: This is a slightly more unique painting method. After the metallic blue coat is dry, spray a layer of clear black. Since clear black has a slight sheen, I follow it up with a coat of matte clear coat. Once the matte clear dries, you're left with this awesome matte metallic blue finish.

Part 2: Weapons & Backpack Construction - MG 1/100 Gundam Astray Blue Frame D
▼Video Walkthrough
Overall, this was a very straightforward build. The painting process took the most time, especially the tedious color separation on those fingers. Thankfully, Vallejo paints are great for hand-brushing, so I got through that part pretty quickly.
▼For the white armor parts, I used Gaia EX-03 Clear Gloss mixed with pearl powder to give the white parts a brilliant pearlescent finish.


▼The backpack was primed with Gaia GS-06 Surfacer EVO Silver, then finished with a topcoat of Gaia 125 Star Bright Duralumin.


▼For the weapons, I started with Gaia Gray Surfacer. After it dried, I applied Gaia EX-03 Black, followed by Gaia EX-07 Silver. Finally, I layered Gaia 043 Clear Black to achieve the desired metallic texture for the weapons.


▼The twelve swords are the defining feature of this Astray. With a dozen blades, the Blue Frame D is just ridiculously overpowered, haha.

▼There are twelve swords in total, six on each side. They can be combined individually or all together to form one massive greatsword.


▼The backpack is another major selling point. Once it's attached, the center of gravity shifts so much that you absolutely need an action base for display.

▼If you don't want to use a stand, you'll have to prop up the extremely heavy backpack with something to prevent the whole kit from tipping backward.


That wraps up the build log for this project. I hope you all enjoyed it!
▼Coming Soon: A full metallic paint job on the Figure-rise Standard Amplified Gallantmon! Stay tuned!

Thanks for following along with the build. Now, please enjoy the photo gallery below.
See you next time with the fully metallic-painted Gallantmon!


Also posted on my Bahamut blog.
My YouTube Channel.
Also posted on my personal blog.
For more model kits and toys, check out my main gallery and the Model History Index, which is updated regularly.