
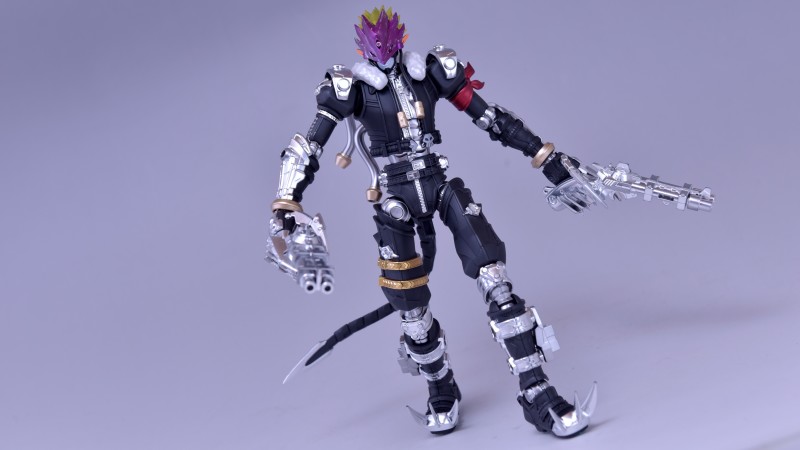


After a recent detour into the Lands Between to become the Elden Lord, I've finally found the time to get back to the workbench.
Today, I'm sharing my fourth Digimon project: the Figure-rise Standard Amplified Beelzemon, one of the Seven Great Demon Lords. The box art alone was so awesome that I pre-ordered it without a second thought.
Thanks to Bandai's incredible engineering, this series just keeps getting better. Even a simple straight build right out of the box looks fantastic. For this project, I decided to go for a full metallic paint job. As my supply of Gaia silver paint started to dwindle, I finally found an excellent silver that's great for layering: a Japanese "Premium Mirror Chrome" paint. In addition, I also picked up a bottle of varnish that's rumored to rival the glossiness of clear urethane.
This was my first time working with this type of mirror-finish paint, let alone using varnish on a model kit. I was surprised I could get the hang of it on the first try. While figuring out the right thinning ratio for the varnish was a bit tricky, I eventually found a consistency that worked for me.
Here's the full build log. If you prefer video, feel free to click below to watch the process.
▼Video Version in 4K (Includes my review of the Japanese Premium Mirror Chrome paint and the varnish)
▼This is the kit we're tackling today. The box art is just incredible—truly fitting for one of the Seven Great Demon Lords.

▼Here are some of the key paints for this build. The large bottle is the varnish.

▼This small bottle contains the Japanese Premium Mirror Chrome paint. It comes pre-thinned, so you can airbrush it straight from the bottle.

▼Here's the main lineup of paints. Besides the new additions, I'm also using various Gaia metallic and clear paints for this Beelzemon build. My process this time is a bit different: I'll be applying the varnish directly over the black primer, followed by the mirror chrome paint. That's right—no other color coat after the black primer! Just varnish, then chrome.

▼All the parts have been prepped and sprayed with either gray or black primer, ready for the main color application.

▼These parts have been coated with varnish after the black primer cured.

▼Black primer typically has a matte finish, but after applying the varnish, the surface becomes incredibly glossy. One thing to note is that this varnish doesn't dry as quickly as lacquer paints. On a good day, it dries fast, but in poor weather, it can take a while to fully cure. The varnish is quite thick out of the bottle, and I didn't think it was suitable for airbrushing directly. I used lacquer thinner to get it to the right consistency, which took some trial and error since it was my first time using it.

▼Here's a comparison. The part on the right shows the finish of the black primer alone. The part on the left has been coated with varnish over the black primer.

▼Once the varnish was fully cured, I started applying the mirror chrome. Here are the results after spraying.

▼So... shiny...

▼This was my first time spraying a mirror-finish paint, and I was amazed I got it right on the first attempt. What's more, I was surprised that painting all these parts used less than 2ml of paint—it's incredibly efficient! I thought I'd use a lot, but once you get the technique down, it goes a long way.
I use a large-nozzle airbrush for my work. After this mirror chrome paint cures, it's very durable; you can rub it with your fingers or a cloth, and it won't come off. The paint film is extremely tough.


▼The black parts were painted with Gaia EX-02, while the white scarf was done with a mix of clear gloss and pearl powder. The silver sections use two different paints: Gaia 1002 and the mirror chrome.

▼Gaia 1002 is one of my favorite metallic paints, but unfortunately, it's getting harder to find! The gold parts were simply painted with Gaia 010.


▼A triple shot of that mirror chrome finish! The red scarf on his arm was painted with a matte metallic red.


▼Almost forgot this shot. I wasn't a huge fan of the original color scheme for the head, so I decided to change it up.

▼I absolutely love how this paint turned out. It's fantastic.

▼Overall, the assembly wasn't very difficult. Some parts require color separation, but I was feeling lazy and just painted them directly without masking. In the end, this Beelzemon kit is just off-the-charts cool!


That's it for this build log! I hope you enjoyed it. For more detailed thoughts and explanations, please check out the video. All in all, this is a fantastic model kit with great value. If you're a fan of the Digimon series, I highly recommend picking it up. Even a straight build looks great thanks to the near-perfect color separation. Now, I wonder if they'll ever release his motorcycle... XD
【Figure-rise Standard Amplified】 The Awesome Seven Great Demon Lords - Beelzemon



Also posted on my Blog
For more model kits and toys, you can check out my collection here. My Model Build History is also updated concurrently.